Imagine you're building a B2B app. As your product grows and attracts more customers, you can boost revenue by offering a more brand-specific experience to each client. To be precise, you can build and sell a separate app for every customer, each with its own logo, colors, and even custom features, while still sharing the same core functionality.
How can this be achieved?
If your answer is duplicating the codebase and replacing logos, icons, styles, and configurations for each client, you've chosen the easiest — but also the most expensive — solution in the long run. As the product becomes more feature-rich, development and maintenance quickly become difficult. Every new feature, improvement, or bug fix must be implemented separately in each codebase, leading to duplicated effort, higher costs, and increased risk of inconsistencies.
This is where white-labelling comes into play.
White-labelling is an approach that allows you to deliver multiple Android and iOS apps from a single Flutter codebase, where each app has its own app name, bundle ID, icons, Firebase setup, and configuration — while all of them share the same underlying business logic.
In this article, we'll walk through a practical, production-ready approach to creating white-label Flutter apps for both Android and iOS. We'll cover how Android flavors and iOS targets and schemes work, how they map to Flutter's build system, and how to structure your project so adding a new client becomes a predictable and scalable process.
This guide is based on real-world experience, not just theory — and by the end, you'll have a clear, step-by-step roadmap that you can confidently use in production.
Let's get started 🔥
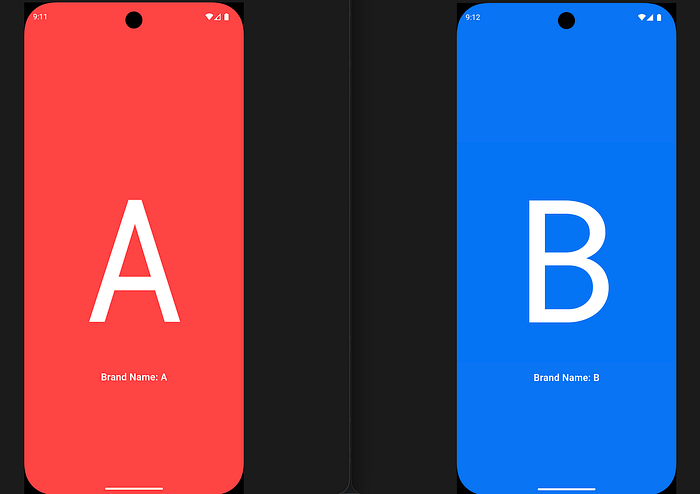
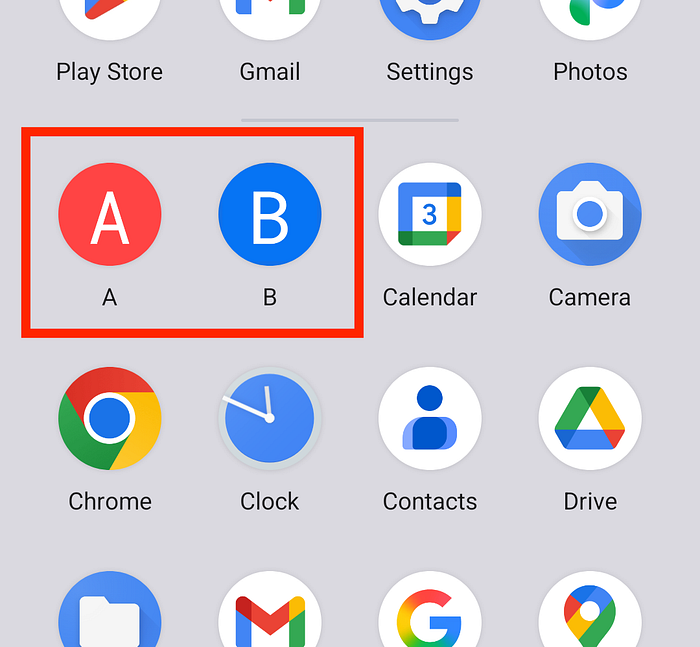
Note: Throughout this guide, we'll use two white-label variants of the same app as examples — one branded for "A" (default) and another for "B".
Android
Step 1: To configure white-label support on Android, we need to modify
android/app/build.gradle.ktsand define product flavors. A product flavor (often referred to simply as a flavor) is a feature of the Android Gradle Plugin that allows you to create and manage multiple variations of the same app from a single codebase.
Before:
...

defaultConfig {
        applicationId = "com.abdulabbozov.multi_scheme_demo"
        minSdk = flutter.minSdkVersion
        targetSdk = flutter.targetSdkVersion
        versionCode = flutter.versionCode
        versionName = flutter.versionName
    }

...
After:
...

flavorDimensions += "app"

productFlavors {
    create("a") {
        dimension = "app"
        applicationId = "com.abdulabbozov.multi_scheme_demo.a"
        resValue("string", "app_name", "A")
    }

    create("b") {
        dimension = "app"
        applicationId = "com.abdulabbozov.multi_scheme_demo.b"
        resValue("string", "app_name", "B")
    }
}

defaultConfig {
    minSdk = flutter.minSdkVersion
    targetSdk = flutter.targetSdkVersion
    versionCode = flutter.versionCode
    versionName = flutter.versionName
}

...
Step 2: To assign a flavor-specific app label (name), we need to update the
android/app/src/main/AndroidManifest.xml, allowing each white-label app to display its own name.
Before:
...

<application
    android:name="${applicationName}"
    android:icon="@mipmap/ic_launcher"
    android:label="A">
...
</application>

...
After:
...

<application
    android:name="${applicationName}"
    android:icon="@mipmap/ic_launcher"
    android:label="@string/app_name">
...
</application>

...
Step 3: Now we'll configure flavor-specific app icons. The icon for the default flavor ("A") remains in
android/app/src/main/res/, while for additional flavors (like "B"), we create a dedicated folder insideandroid/app/src/and generate the corresponding app icons there.

This is the final step of the white-label setup on the Android side. Before testing our configuration, we need to implement a simple brand-specific user interface on the Flutter side.
Flutter
Step 1: We need to implement simple brand-specific user interface in Flutter side for each of our flavors like below:
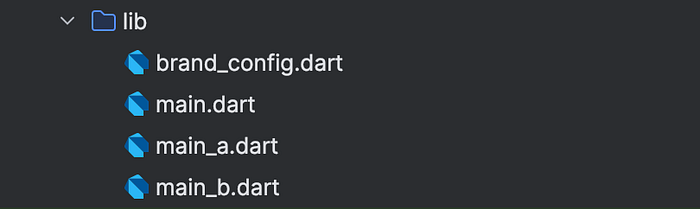
To adapt the UI for each flavor, we define a new brand_config.dart file, which will hold flavor-specific configuration such as colors, logos, and styles:
import 'package:flutter/material.dart';

enum AppScheme { a, b }

/// Brand configuration class for white-labeling
/// This allows different branded versions of the app from a single codebase
class BrandConfig {
  final String brandName;
  final String appName;
  final String applicationId;
  final String bundleId;
  final BrandColors colors;
  final BrandAssets assets;

  const BrandConfig({
    required this.brandName,
    required this.appName,
    required this.applicationId,
    required this.bundleId,
    required this.colors,
    required this.assets,
  });
}

class BrandColors {
  final Color primaryColor;

  const BrandColors({required this.primaryColor});
}

class BrandAssets {
  final String logoPath;

  const BrandAssets({required this.logoPath});
}

class SchemeConfig {
  static AppScheme? _currentScheme;
  static BrandConfig? _brandConfig;

  static void setScheme(AppScheme scheme) {
    _currentScheme = scheme;
    _brandConfig = _getBrandConfig(scheme);
  }

  static AppScheme get currentScheme {
    return _currentScheme ?? AppScheme.a;
  }

  static BrandConfig get brandConfig {
    if (_brandConfig == null) {
      throw Exception(
        'Brand config not initialized! Call SchemeConfig.setScheme() first.',
      );
    }
    return _brandConfig!;
  }

  static bool get isA => _currentScheme == AppScheme.a;

  static bool get isB => _currentScheme == AppScheme.b;

  /// Get brand configuration for a specific scheme
  static BrandConfig _getBrandConfig(AppScheme scheme) {
    switch (scheme) {
      case AppScheme.a:
        return _a;
      case AppScheme.b:
        return _b;
    }
  }

  /// App A configuration
  static final BrandConfig _a = BrandConfig(
    brandName: 'A',
    appName: 'A',
    applicationId: 'com.abdulabbozov.multi_scheme_demo.a',
    bundleId: 'com.abdulabbozov.multiSchemeDemo.a',
    colors: BrandColors(primaryColor: Color(0xFFFF4444)),
    assets: BrandAssets(logoPath: 'assets/a.png'),
  );

  /// App B configuration
  static final BrandConfig _b = BrandConfig(
    brandName: 'B',
    appName: 'B',
    applicationId: 'com.abdulabbozov.multi_scheme_demo.b',
    bundleId: 'com.abdulabbozov.multiSchemeDemo.b',
    colors: BrandColors(primaryColor: Color(0xFF0974F4)),
    assets: BrandAssets(logoPath: 'assets/b.png'),
  );
}
To set flavor in Flutter side, we need to call setScheme function of SchemeConfig class inside main.dart:
...

void main({AppScheme scheme = AppScheme.a}) async {
  WidgetsFlutterBinding.ensureInitialized();
  SchemeConfig.setScheme(scheme);
  runApp(const MyApp());
}

...
Step 2: Build UI of main page based on flavor's BrandConfig
class MyApp extends StatelessWidget {
  const MyApp({super.key});

  @override
  Widget build(BuildContext context) {
    final brandConfig = SchemeConfig.brandConfig;
    return MaterialApp(
      debugShowCheckedModeBanner: false,
      home: Scaffold(
        backgroundColor: brandConfig.colors.primaryColor,
        appBar: AppBar(
          toolbarHeight: 0,
          centerTitle: true,
          backgroundColor: brandConfig.colors.primaryColor,
        ),
        body: Column(
          mainAxisAlignment: MainAxisAlignment.center,
          crossAxisAlignment: CrossAxisAlignment.center,
          children: [
            Padding(
              padding: const EdgeInsets.only(bottom: 16),
              child: Image.asset(brandConfig.assets.logoPath),
            ),
            Text(
              "Brand Name: ${brandConfig.brandName}",
              style: TextStyle(
                fontSize: 18,
                fontWeight: FontWeight.w600,
                color: Colors.white,
              ),
            ),
          ],
        ),
      ),
    );
  }
}
Step 3: Next we create two entry points:
main_a.dartandmain_b.dartthat is used instead of defaultmain.dart.
main_a.dart:
import 'package:multi_scheme_demo/brand_config.dart';
import 'main.dart' as app;

void main() {
  app.main(scheme: AppScheme.a);
}
main_b.dart:
import 'package:multi_scheme_demo/brand_config.dart';
import 'main.dart' as app;
void main() {
app.main(scheme: AppScheme.b);
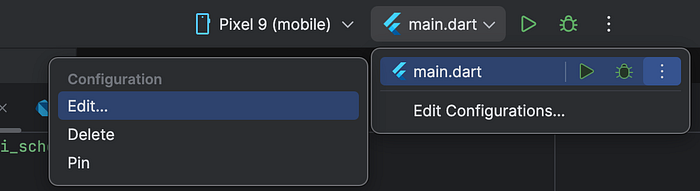
}Step 4: Now we edit default build configuration in AndroidStudio and create new ones per flavor.
Before:

After:

Step 5: With the configuration in place, it's time to test our setup.
iOS
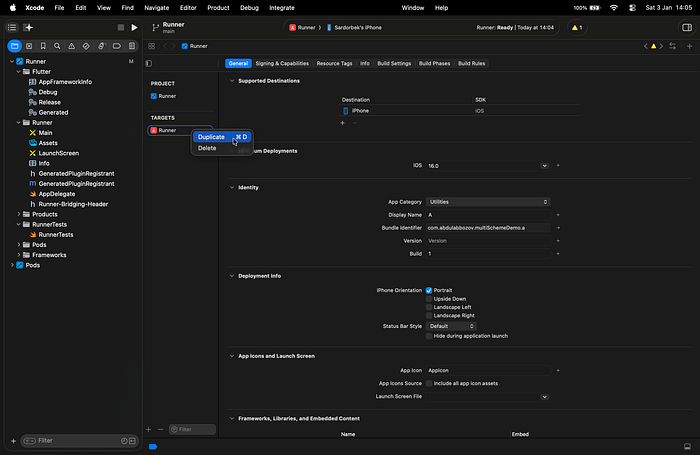
Step 1: Now we setup white-label configuration on iOS. We start by duplicating existing Runner under Targets section of workspace in Xcode and rename it "B". In Xcode, "runner" often refers to the executable environment or a specific test runner utility used to execute the actions defined in the scheme, while the term "scheme" is a fundamental organizational tool that defines what to build and how to do it (run, test, profile, etc.)
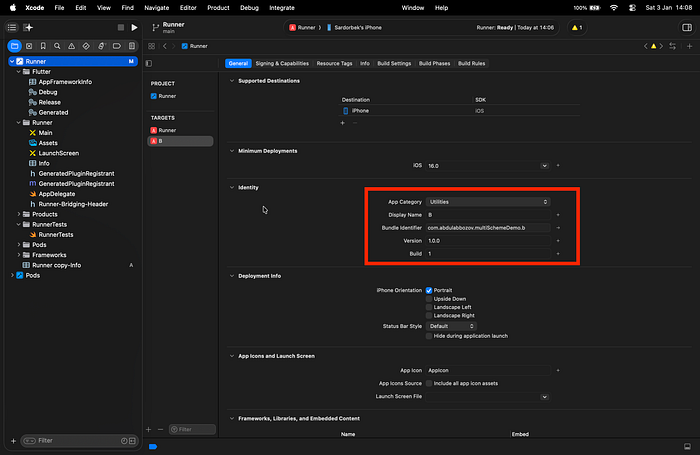
Step 2: Then we edit app identity of our new target.
Step 3: It is optional but recommended to link a new
ios/Runner/TARGET_NAME-Info.list(ios/Runner/b-Info.listin our case) by duplicatingios/Runner/Info.listand modifying necessary values.
Info.list (for default target (Runner) — "A"):

b-Info.list (for target — "B"):

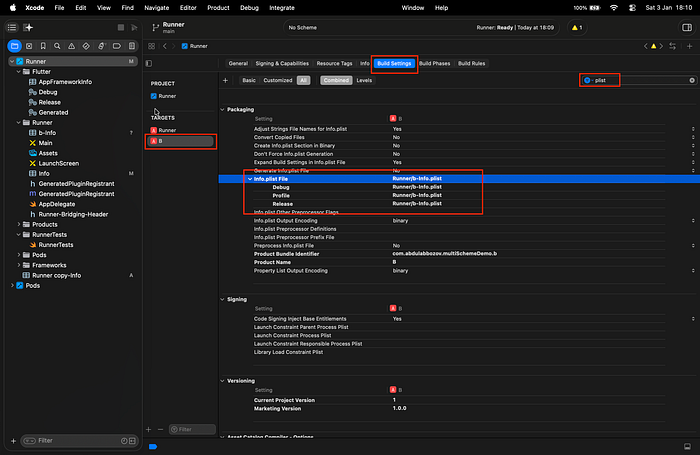
To link the new b-Info.plist to target B, navigate to:
Targets → B → Build Settings → Packaging → Info.plist File and set the value to Runner/b-Info.plist.
Note: Make sure this value is set for all build configurations.
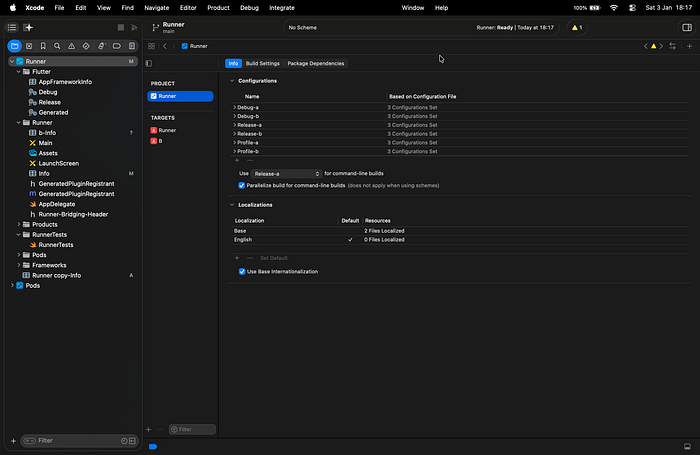
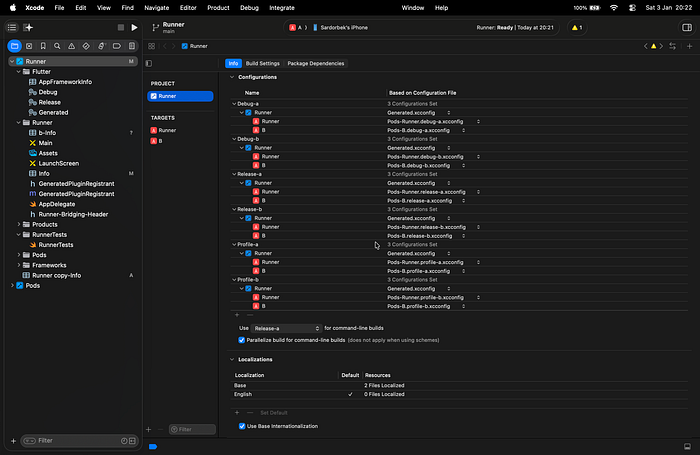
Step 4: Navigate to Project → Runner → Info in Xcode. Here, you'll see the three default build configurations: Debug, Release, and Profile. Click the "+" button below the configuration list to duplicate each configuration. After duplicating, it's recommended to rename all configurations using the format: BUILD_CONFIG–TARGET_NAME
Before:

After:
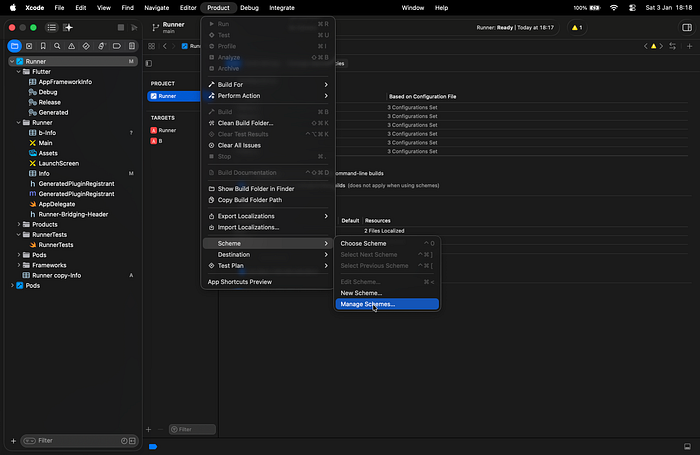
Step 5: Next, navigate to Product → Scheme → Manage Schemes… to manage and configure your schemes.
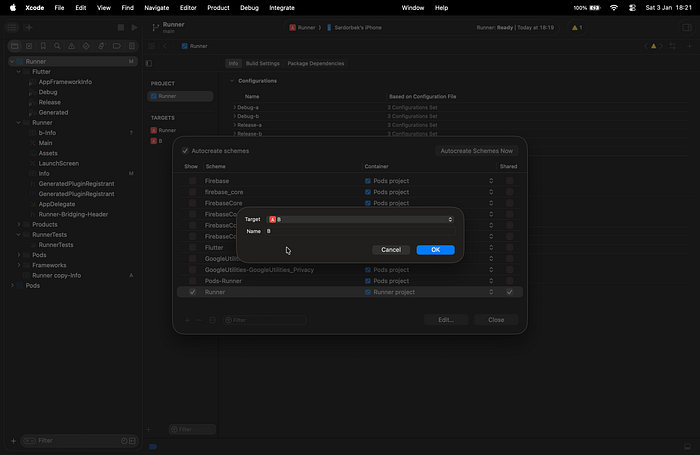
Click the "+" button and enter the new scheme name. Make sure target B is selected.
Now you should see the new Runner scheme (you can optionally rename it to "A" for consistency) along with scheme B in the scheme list. Double-click the scheme B to open the configuration window. On the left panel, you'll see the options Build, Run, Test, Profile, Analyze, and Archive, each linked to a specific build configuration.
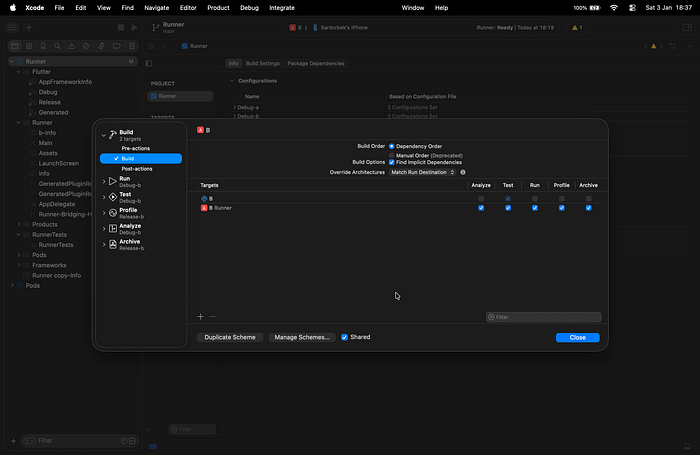
Update these settings so that they point to the corresponding build configurations for target B. In our example, all occurrences of Debug-a and Release-a should be replaced with Debug-b and Release-b, respectively (see image below).
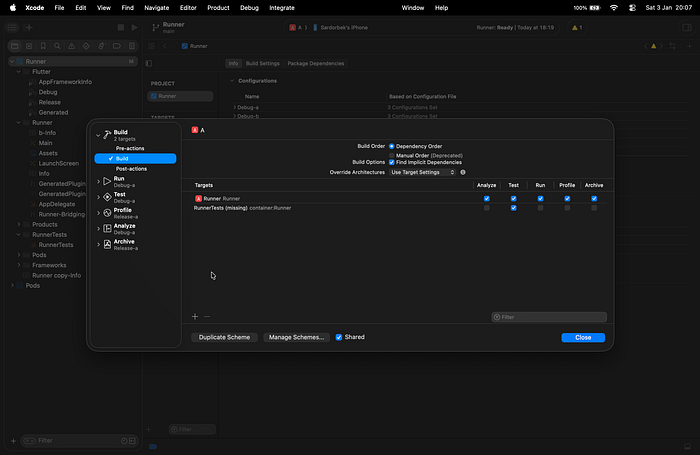
Repeat this step for scheme A/Runner as well to ensure all schemes are correctly configured.
Before:
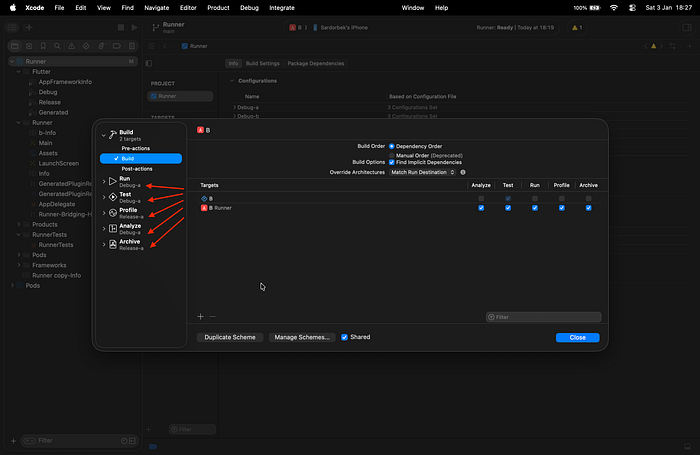
After:
- Scheme B:
- Scheme A:
Step 6: Now we edit our
ios/Podfilein AndroidStudio
Before:
...

project 'Runner', {
  'Debug' => :debug,
  'Profile' => :release,
  'Release' => :release,
}

...

target 'Runner' do
  use_frameworks!

  flutter_install_all_ios_pods File.dirname(File.realpath(__FILE__))
end

...
After:
...

project 'Runner', {
  'Debug-a' => :debug,
  'Profile-a' => :release,
  'Release-a' => :release,
  'Debug-b' => :debug,
  'Profile-b' => :release,
  'Release-b' => :release,
}

...

# Shared pods for both targets
def shared_pods
  use_frameworks!
  use_modular_headers!
  flutter_install_all_ios_pods File.dirname(File.realpath(__FILE__))
end

# Runner target (a)
target 'Runner' do
  shared_pods
end

# b target
target 'B' do
  shared_pods
end

...
Note: To ensure these changes take effect, run pod install inside the ios directory and reopen Xcode afterward.
Step 7: The next step of the setup is to link the appropriate
.xcconfigfiles generated by the Podfile to their respective build configurations. Once completed, the configuration should look like this:
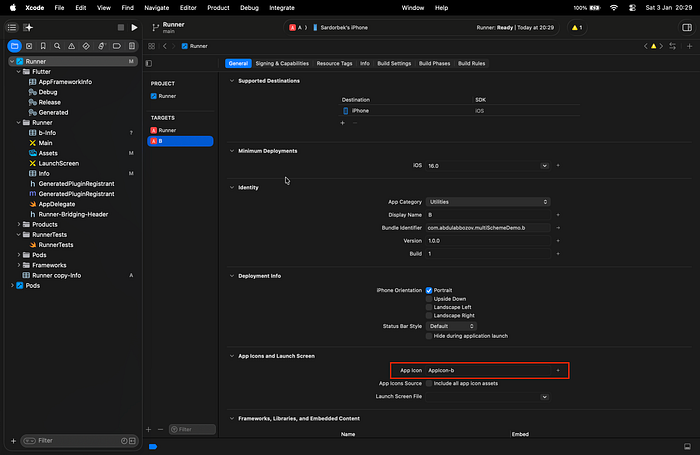
Step 8: The penultimate step is to set up and assign a dedicated app icon for each target.

Once the AppIcon sets are added to assets for each target, assign the correct set name in the App Icon field under Targets → General → App Icons and Launch Screen for each target:
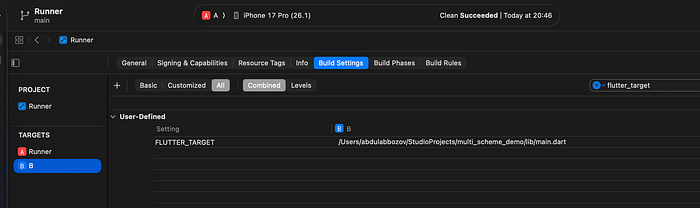
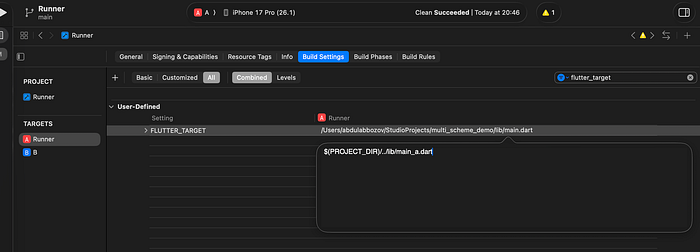
Step 9: The final phase is to change value of
FLUTTER_TARGETsettings to its own dart entry points (main_a.dart and main_b.dart, in our case) instead of main.dart. We can change this value from Targets → Build Settings → User-Defined (you can search "FLUTTER_TARGET" in search bar to easily find).
Before:

After:

Step 10: With the all configuration in place for iOS, it's time to test our setup.
Conclusion
Setting up flavors, targets, schemes, and build configurations may take extra time upfront, but it is highly cost-effective in the long run. Once your white-label infrastructure is in place, adding new clients or brands becomes a predictable, scalable, and low-maintenance process, saving countless hours of duplicated work down the line.
Although this article covers the Android and iOS setup for a multi-flavor/scheme environment, the next part of the series will focus on correctly configuring Firebase for white-labeled apps.
You can also find the complete example code on GitHub