


There are two categories of animations in Flutter: explicit and implicit.
Implicit use of Animated widgets like AnimatedContainer or AnimatedOpacity.
Explicit use AnimationController.
If you are a member, please continue; otherwise, read the full story here.
· 1. AnimationController · 2. Tweens · 3. Transform · 4. Curves · 5. Physics · 6. Springs · 7. The inspiration · 8. The code in the repository
1. AnimationController
The name of this class is perfect: it controls animation.
But how does animation work in Flutter? It works in the same way as Flutter in general: first, we change the state, then we rebuild the widget.
_controller = AnimationController(
      vsync: this,
      duration: Duration(seconds: 1),
    )..addListener(() {
      setState(() {
        _size = _sizeAnimation.value;
      });
    });
    _sizeAnimation = _controller.drive(Tween(begin: 50.0, end: 150.0));
The above code uses the setState() method from StatefulWidget to change the state and update the underlying widget tree.
Flutter can draw 60 (or even 120) frames per second.
To create a smooth animation, the controller updates the state 60 (or 120) times per second as well. The code below is called 60 (120) times per second:
setState(() {
        _size = _sizeAnimation.value;
      });
But to do this, the controller needs the TickerProvider. The Ticker is a kind of Timer synchronized with Flutter's frames.
class _AnimationPageState extends State<AnimationPage>
    with TickerProviderStateMixin {
...
vsync: this,
The above code demonstrates the usual approach of obtaining the TickerProvider.
This article provides an alternative approach that allows putting animation controllers into the ViewModel and having better SoC.
The AnimationController provides methods to control animations like: forward, reverse, stop, and more. I will probably write an AnimationController cheat sheet article to check them all.
2. Tweens
The AnimationController has the value property that is updated 60–120 times per second and ranges from 0.0 to 1.0.
0.0
0.01666
0.03333
...
0.98334
1.0
It is not very useful and can only be used for animations, which require values from 0.0 to 1.0.
For example, opacity:
_controller = AnimationController(
      vsync: this,
      duration: Duration(seconds: 1),
    )..addListener(() {
      setState(() {
        _opacity = _controller.value;
      });
    });
...

Opacity(
  opacity: _opacity,
  child: Container(color: Colors.blue),
)
For other types of animations, we need a Tween class.
Tween<T extends Object?> class
A linear interpolation between a beginning and ending value.
Our first example uses Tween to create double values between 50.0 and 150.0:
_controller = AnimationController(
      vsync: this,
      duration: Duration(seconds: 1),
    )..addListener(() {
      setState(() {
        _size = _sizeAnimation.value;
      });
    });
    _sizeAnimation = _controller.drive(Tween(begin: 50.0, end: 150.0));
If we want to animate, for example, Shadow (or any other widget or property that uses Offset), we will use Tween<Offset> like below:
_animation = _controller.drive(
  Tween<Offset>(
    begin: const Offset(100.0, 50.0),
    end: const Offset(200.0, 300.0),
  ),
);
Animate the color from red to blue?
_animation = _controller.drive(
  Tween<Color>(
    begin: Colors.red,
    end: Colors.blue,
  ),
);
Ooops, exception:
Cannot lerp between
"MaterialColor(primary value: Color(alpha: 1.0000, red: 0.1294,
green: 0.5882, blue: 0.9529, colorSpace: ColorSpace.sRGB))"
and "MaterialColor(primary value: Color(alpha: 1.0000, red: 0.9569,
green: 0.2627, blue: 0.2118, colorSpace: ColorSpace.sRGB))".
The type MaterialColor might not fully implement `+`, `-`, and/or `*`.
See "Types with special considerations"
at https://api.flutter.dev/flutter/animation/Tween-class.html
for more information.
To lerp colors, consider ColorTween instead.
Revealed that sometimes Tween<Something> does not work and we should use SomethingTween instead. Okay. 🙄
late final AnimationController animationController;

  late final Animation<Color?> _colorAnimation;
  Color _color = Colors.blue;
  ...

    animationController = AnimationController(
      vsync: this,
      duration: Duration(seconds: 1),
    )..addListener(() {
        setState(() {
          _color = _colorAnimation.value!;         });
        });
    _colorAnimation =
ColorTween(begin: Colors.blue, end: Colors.red).animate(animationController);

               Container(
                  color: _color,
                  width: 200,
                  height: 200,
                );
...

              CupertinoButton.filled(
                onPressed: () {
                  animationController.forward();
                },
That works:

Note that with Tween<Something> we have used
animationController.drive(Tween(...));But with SomethingTween we have used
ColorTween(...).animate(animationController);Sorry, Flutter team, but I can imagine a more consistent API. 🤨
3. Transform
A widget that applies a transformation before painting its child.
Since Transform applies a transformation, it can be animated.
Flip:

animationController = AnimationController(
      vsync: this,
      duration: Duration(seconds: 1),
    )..addListener(() {
        setState(() {
         _flip = _flipAnimation.value!;
        });
      });
    _flipAnimation = Tween(begin: 0.0, end: 1.0).animate(animationController);
           Transform(
            transform: Matrix4.identity()
              ..setEntry(3, 2, 0.002)
              ..rotateX(pi * _flip ),
            alignment: FractionalOffset.center,
                  child: Container(
                    color: Colors.blue,
                    width: 200,
                    height: 200,
                  ),
                );
Transform has Transform.flip named constructor, but it cannot be used for animation.
Transform.translate:
animationController = AnimationController(
      vsync: this,
      duration: Duration(seconds: 2),
    )..addListener(() {
        setState(() {
         _offset = _translateAnimation.value!;
        });      });
    _translateAnimation = Tween(
      begin: Offset(0, 0), end: Offset(0, 400)).animate(animationController);
               Transform.translate(
                  offset: _offset,
                  child: Container(
                    color: Colors.blue,
                    width: 200,
                    height: 200,
                  ),
                );
There are also Transform.rotate and Transform.scale. It is absolutely clear what kind of transformation they do, and with the examples given above, it is not hard to create animations. Do it as homework. 😎
4. Curves
By default, the Tween produces values that change linearly.
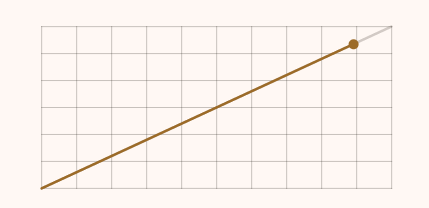
It can be changed using curves. Flutter has a Curves class that contains about 40 different curves that can be applied to animations.
The Curves class page contains a lot of videos visualizing curves:
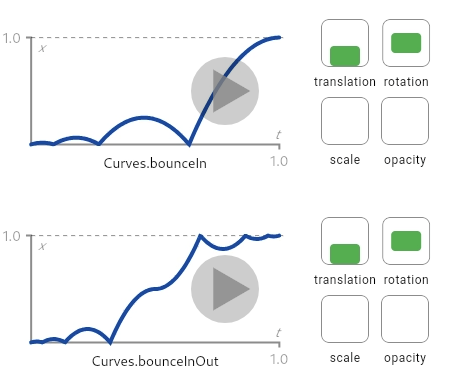
And there is also a very nice tool, written in Flutter, that allows choosing the curve and seeing how it works with different animation types.
Here is how we add a curve to an animation:
animationController = AnimationController(
      vsync: this,
      duration: Duration(seconds: 2),
    )..addListener(() {
       setState(() {
         _flip = _flipAnimation.value!;
        });
      });
    _flipAnimation = Tween(begin: 0.0, end: 1.0).animate(
        CurvedAnimation(parent: animationController,
                        curve: Curves.elasticInOut));  //<-
Instead of:
_flipAnimation = Tween(begin: 0.0, end: 1.0).animate(animationController);We call:
_flipAnimation = Tween(begin: 0.0, end: 1.0).animate(
        CurvedAnimation(parent: animationController,
                        curve: Curves.elasticInOut));
Our flip animation looks much more interesting now:
5. Physics
Physics is a Flutter library that contains classes with a Simulation suffix. Like GravitySimulation, FrictionSimulation and so on.
The destiny of these classes is to be used in animations and make them look more natural.
Let's check the GravitySimulation:
...
   animationController = AnimationController.unbounded(
      vsync: this,
    )..addListener(() {
        setState(() {
          _value = animationController.value;
        });
     });
  }

  void fall() {
    animationController.animateWith(GravitySimulation(2000, 20, 1000, 0));
  }
               Positioned(
                  top: _value,
                  child: Container(
                    color: Colors.blue,
                    width: 200,
                    height: 200,
                  ),
                );
...

               CupertinoButton.filled(
                onPressed: () {
                  if (animationController.isCompleted){
                    animationController.reset();
                  }
                  fall();
                },
Key differences from the previous animations:
- We have used
AnimationController.unboundedconstructor - We haven't specified the
duration - We have used
AnimationController.animateWithmethod - We haven't used the
forwardmethod to start animation
We can see that the animation starts slowly and gradually increases in speed like a real falling object.
Let's look at GravitySimulation constructor:
GravitySimulation(
  double acceleration,
  double distance,
  double endDistance,
  double velocity,
)
Creates a GravitySimulation using the given arguments, which are, respectively: an acceleration that is to be applied continually over time; an initial position relative to an origin; the magnitude of the distance from that origin beyond which (in either direction) to consider the simulation to be "done", which must be positive; and an initial velocity.
The endDistance is actually the height from which the object falls down. If we change it to 400
animationController.animateWith(
GravitySimulation(2000,
                  20,
                  400,   //<-
                  0));
We will see our blue container stopping right behind the button.
The FrictionSimulation simulates the moving object that starts moving with an initial speed and then slows down because of drag.

 animationController = AnimationController.unbounded(
      vsync: this,
    )..addListener(() {
       setState(() {
          _value = animationController.value;
        });
      });
  }

  void fall() {
    animationController.animateWith(FrictionSimulation(0.7, 0, 100,));
  }
There are no changes on view.
The constructor:
FrictionSimulation(
  double drag,
  double position,
  double velocity, {
  Tolerance tolerance = Tolerance.defaultTolerance,
  double constantDeceleration = 0,
})
The drag parameter is a coefficient of drag.
The position is relative to a widget position.
And velocity is the initial velocity.
6. Springs
SpringSimulation is actually part of the Physics library, but it works slightly differently from others and is also important enough to have its own chapter.
I was seriously confused by the name. 😋
I thought it was this:
I didn't even know that the word Spring has another meaning:
Did you? — Leave a comment.
Here is an example of SpringSimulation:

Our blue container behaves like a heavy object hanging on a spring.
 ...

    animationController = AnimationController.unbounded(
      vsync: this,
      //  duration: Duration(seconds: 2),
    )..addListener(() {
       setState(() {
          _value = animationController.value;
        });
      });
  }

  void fall() {
    animationController.animateWith(SpringSimulation(
      const SpringDescription(
        mass: 5.8,
        stiffness: 15,
        damping: 0.1,
      ),
      0.0, // starting position
      300.0, // ending position
      100.0, // starting velocity
    ));
  }
No changes on View.
The constructor:
SpringSimulation(
      const SpringDescription(
        mass: 5.8,
        stiffness: 15,
        damping: 0.1,
      ),
      0.0, // starting position
      300.0, // ending position
      100.0, // starting velocity
    ));
I think everything is self-explanatory except for the damping.
The meaning of the word damping is the decrease of amplitude. Practically, with smaller values, we will see more bouncing. And vice versa.
7. The inspiration
I was always thinking that the subject of implicit animations with AnimationController is too complicated and not worth the time — many packages make animations simpler.
But I read this article
https://chooyan.hashnode.dev/all-i-know-about-animationcontroller?source=more_series_bottom_blogs
and understood that AnimationController is not that complicated.
The author has the talent of explaining non-trivial things. I warmly recommend reading all his articles starting from the above.
8. The code in the repository
You will find the code for all the above examples in this repository. While in the article, I adapted the snippets for quasi using StatefulWidgets, I was actually using GetX. So, if you are not a GetX user, be careful — GetX is addictive. 😎
👉More stories about Flutter animations
Thank you for reading and happy animating!